Introduction
In the previous article on Part 1: Introduction to AngularJS we have seen some introductory material and few directives with the help of a sample application to understand basics of AngularJS. So I think we are somewhat familiar about AngularJS and now it’s time to go more on it. Let’s proceed with this part of the tutorial where we will try to understand the most basic and impressive feature of AngularJS i.e. Data Binding.
To explore about the complete AngularJS Topics, Please Visit AngularJS Complete Topics
Background
Data binding is the most useful and powerful feature among any of the existing or upcoming software development technologies. It is actually a process that bridges a connection between the view and business logic of the application.
Basically we will see one-way and two-way data binding with respect to AngularJS applications. But before we jump to that section we will try to learn something about the scopes in AngularJS.
Scopes In Angular World
First of all let us try to understand about scope. I left this topic in our previous article so lets continue with this because this has lot to do with AngularJS applications. Scopes are a core fundamental of any AngularJS application. Since they are used all over in any AngularJS application, so it's important to know about them and their working. In AngularJS, scopes are those objects that contain functionality and the data that has to be used when rendering the view. The scopes of the application refer to the application model, so you can think of scopes as a view model.
Scopes are the source of truth for the application state. Because of this live binding, we can rely on the$scope to update immediately when the view modifies it, and we can rely on the view to
update when the $scope changes.
Functions Of Scopes:
1) Provides observers to watch for all the model changes.
2) Provides the ability to propagate model changes through the application as well as outside the system to other components associated.
3) Scopes can be nested in such a way that they can isolate functionality and model properties.
4) Provides an execution environment in which expressions are evaluated.
There is lot of things to know about scope and we will discuss slowly on lifecycle of scope and see how internally it handles request/response in the browser in our later articles as we go deeper.
Basic Data Binding/One-Way Data Binding
One-way data binding is an approach where a value is taken from the data model and inserted into an HTML element. There is no way to update model from view.
AngularJS provides some predefined data binding directives which are as follows:
ng-bind – Binds the inner Text property of an HTML element.
ng-bind-template - Almost similar to the ng-bind directive but allows for multiple template.
ng-non-bindable - Declares a region of content for which data binding will be skipped.
ng-bind-html - Creates data bindings using the inner HTML property of an HTML element.
ng-model - Creates a two-way data binding.
Let us try to understand some of the directives programatically which will show you how one can use in their application in the real world scenario. I have created a module in my previous article Part 1: Introduction to AngularJS and I am using the same and also I will be extending the controller from the same.
This is how our app.js file looks
var app = angular.module('MyApp',[]);
Below is our maincontroller.js and I named it as "BookStore".
app.controller("BookStore", function($scope)
     {
        $scope.items = [
            {ISBN:"5674789", Name: "Asp.Net MVC", Price: 560, Quantity: 20},
            {ISBN:"4352134",Name: "AngularJS", Price: 450, Quantity: 25},
            {ISBN:"2460932",Name: "Javascript", Price: 180, Quantity: 15}
        ];
});
And here comes our html page which will be displayed on your browser.
<html ng-app="MyApp">
   <head>
      <title>Basic Binding App</title>
      <script src="angular.min.js"></script>
      <link rel="stylesheet" type="text/css" href="main.css" />
      <script src="app.js" type="text/javascript"></script>
      <script src="maincontroller.js" type="text/javascript"></script>
   </head>
   <body>
      <div ng-controller="BookStore">
         <table class="mytable">
            <tr>
               <td>
                  <span>Below output is produced from AngularJS's <strong>{{}}</strong> directive.</span>
               </td>
            </tr>
            <tr ng-repeat="item in items">
               <td>
                  <p> <b>{{item.Name}}</b> is in our stock.</p>
               </td>
            </tr>
         </table>
         <table class="mytable">
            <tr>
               <td>
                  <span>Below output is produced from AngularJS's <strong>ng-bind</strong> directive.</span>
               </td>
            </tr>
            <tr ng-repeat="item in items">
               <td>
                  <p> <b><span ng-bind="item.Name"></span></b> is in our stock.</p>
               </td>
            </tr>
         </table>
         <table class="mytable">
            <tr>
               <td>
                  <span>Below output is produced from AngularJS's <strong>ng-non-bindable</strong> directive.</span>
               </td>
            </tr>
            <tr ng-repeat="item in items">
               <td>
                  <div ng-non-bindable>
                     <p> <b>{{item.Name}}</b> is in our stock.</p>
                  </div>
               </td>
            </tr>
         </table>
      </div>
   </body>
</html>
The above example illustrates about 2 directives which are used for Data Binding viz. ng-bind and ng-non-bindable. We will also see ng-model in the next section when we will talk about two-way binding in AngularJS. I have not used ng-bind-template and ng-bind-html but we will get into it when we will come to learn about templating stuff in AngularJS.
This is the final output when you run the BasicBinding.html.

From the output you can see when we used {{ }} the output is as expected since it is AngularJS's default way of handling model binding. In the second section we used data binding directive ng-bind and the third one we used is ng-non-bindable which allows us to skip data bind to that particular section where it is defined. Also there is ng-repeat-directive which helps us to iterate throughout the collection. The collection that I used can be implemented with the help of some sort of Web-Api calls which will provide some JSON data that you can directly use it to bind.
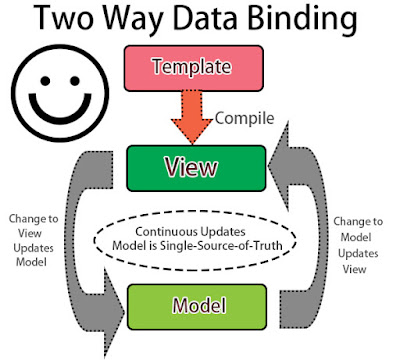
Two-Way Data Binding
In simple terms two-way data binding is when the model changes, the view reflects the change, and vice versa. Two-way bindings in AngularJS are created with the ng-model directive. Practically, two-way bindings can be applied only to those elements that allow the user to provide a data value, which means the input, textarea, and select elements.
Let us now try to see how we can implement two-way binding in any application. Add a new html page as I created below:
<html ng-app="MyApp">
<head>
<title>Books</title>
 <script src="angular.min.js"></script>
    <link rel="stylesheet" type="text/css" href="main.css" />
    <script src="app.js" type="text/javascript"></script>
    <script src="maincontroller.js" type="text/javascript"></script>
</head>
<body>
<div>
        <div ng-controller="BookStore">
            <br />
            <div style="padding-top:15px;">
            <table border="1" class="mytable">
                    <tr>
                        <td>ISBN</td>
                        <td>Name</td>
                        <td>Price</td>
                        <td>Quantity</td>
                        <td>Total Price</td>
                        <td>Action</td>
                    </tr>


                    <tr ng-repeat="item in items">
                        <td>{{item.ISBN}}</td>
                        <td>
                           <span ng-hide="editMode">{{item.Name}}</span>
                           <input type="text" ng-show="editMode" ng-model="item.Name" />
                        </td>
                        <td>
                           <span ng-hide="editMode">{{item.Price}}</span>
                           <input type="number" ng-show="editMode" ng-model="item.Price"  />
                        </td>
                        <td>
                           <span ng-hide="editMode">{{item.Quantity}}</span>
                           <input type="number" ng-show="editMode" ng-model="item.Quantity"  /></td>
                        <td>{{(item.Quantity) * (item.Price)}}</td>
                        <td>
                             <span> <button type="submit" ng-hide="editMode" ng-click="editMode = true; editItem(item)" >Edit</button></span>
                             <span> <button type="submit" ng-show="editMode" ng-click="editMode = false">Save</button></span>
                             <span><input type="button" value="Delete" ng-click="removeItem($index)" /></span>
                        </td>
                    </tr>

            </table></div>
            <br />
            <div style="font-weight:bold">Grand Total: {{totalPrice()}}</div>
            <br />
        </div>
    </div>
</body>
</html>
Now extend our controller and implement some functionalities to show items on the table and allow users to perform edit, save and delete the data on the table. Since in this application we are not using any Web Service or Web API to post data to the server so I haven,t written functionality to collect and post data to server through some ajax request. As we go long we will try to extend application that uses some sort of Web Api to post data to server.
app.controller("BookStore", function($scope)
  {
  $scope.items = [
   {ISBN:"5674789", Name: "Asp.Net MVC", Price: 560, Quantity: 20},
   {ISBN:"4352134",Name: "AngularJS", Price: 450, Quantity: 25},
   {ISBN:"2460932",Name: "Javascript", Price: 180, Quantity: 15}
  ];
                $scope.editing = false;

  $scope.totalPrice = function(){
   var total = 0;
   for(count=0;count<$scope.items.length;count++){
    total += $scope.items[count].Price*$scope.items[count].Quantity;
   }
   return total;
  }

  $scope.removeItem = function(index){
   $scope.items.splice(index,1);
  }
  $scope.editItem = function(index){
    $scope.editing = $scope.items.indexOf(index);

  }
   $scope.saveField = function(index) {
        if ($scope.editing !== false) {
   $scope.editing = false;
        }
    };


    };
 }
 );

Now let us write function to add items collected from the view to our table.
$scope.addItem = function(item) {
   $scope.items.push(item);
   $scope.item = {};
       }
To use this functionality we will need something to get input from the user. So now I will add html tags to get the input. You can see I have used
ng-model="item.ISBN" and this will actually provide two-way binding facility to us.<h2>Add New Book</h2>
<div style="border: 1px solid blue;">
<table>
<tr>
<td>ISBN: </td>
<td>
<input type="text" ng-model="item.ISBN" />
</td>
</tr>
<tr>
<td>Name: </td>
<td>
<input type="text" ng-model="item.Name" />
</td>
</tr>
<tr>
<td>Price(In Rupee): </td>
<td>
<input type="number" ng-model="item.Price" />
</td>
</tr>
<tr>
<td>Quantity: </td>
<td>
<input type="number" ng-model="item.Quantity" />
</td>
</tr>
<tr>
<td colspan="2">
<input type="Button" value="Add to list" ng-click="addItem(item)" />
</td>
</tr>
</table>
</div>
We are now done with the code. Its time to see in the end how our application looks like. So here it is the result where you can perform the CRUD operations.

Please visit our Best AngularJS Training in Chennai to book your free Demo!!
This comment has been removed by the author.
ReplyDeleteInspiring writings and I greatly admired what you have to say , I hope you continue to provide new ideas for us all and greetings success always for you..Keep update more information..
ReplyDeleterpa training in Chennai | best rpa training in chennai
rpa training in pune
rpa online training | rpa training in bangalore
I think you have a long story to share and i am glad after long time finally you cam and shared your experience.
ReplyDeleteData Science Training in Chennai | Data Science training in anna nagar
Data Science training in chennai | Data science training in Bangalore
Data Science training in marathahalli | Data Science training in btm
I really appreciate this post. I’ve been looking all over for this! Thank goodness I found it on Bing. You’ve made my day! Thx again!
ReplyDeletejava training in jayanagar | java training in electronic city
java training in chennai | java training in USA
Thanks for your informative article, Your post helped me to understand the future and career prospects & Keep on updating your blog with such awesome article.
ReplyDeletepython training in rajajinagar
Python training in btm
Python training in usa
Thank you for benefiting from time to focus on this kind of, I feel firmly about it and also really like comprehending far more with this particular subject matter. In case doable, when you get know-how, is it possible to thoughts modernizing your site together with far more details? It’s extremely useful to me.
ReplyDeleteTableau online training
Great content thanks for sharing this informative blog which provided me technical information keep posting.Awesome..You have clearly explained …Its very useful for me to know about new things.
ReplyDeleteSql server dba online training
Wonderful article, very useful and well explanation. Your post is extremely incredible...Thanks you for sharing this unique useful information content with us. Really awesome work. keep on blogging
ReplyDeleteOracle DBA Online Training
I am really very happy to read this blog!!
ReplyDeleteandroid training in chennai
android online training in chennai
android training in bangalore
android training in hyderabad
android Training in coimbatore
android training
android online training
This comment has been removed by the author.
ReplyDelete